Upload conversations
To upload conversations to our platform, you have two options:
- Manually upload the conversations.
- Set up an automated process that streams the conversations into the system at regular intervals, based on your preference.
Manually upload the conversations
To manually upload conversations, use the button located at the top of the Conversation Analysis page.

After clicking the button, you can manually upload a conversation in two ways:
- Paste the conversation text in JSON format.
- Upload a JSON file from your computer.
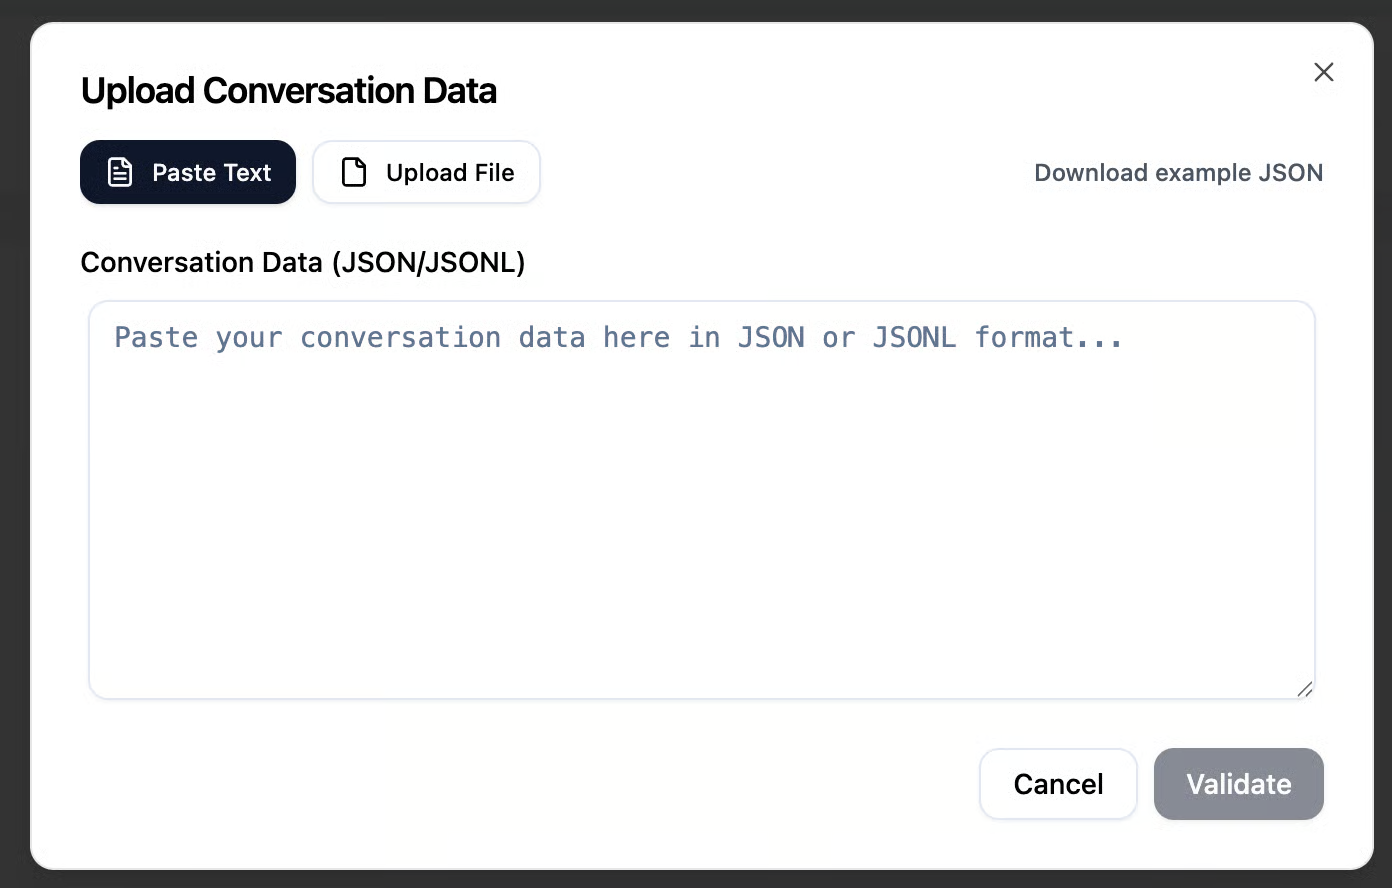
The conversation must be uploaded in JSON or JSONL format. A specific format is provided, which you can adapt your conversations to before uploading.
A sample JSON format for adapting your conversations will be provided on the next page.
After uploading the file or pasting your conversation in JSON format, you can click the Validate button to preview how the conversation will appear before submitting it to the system.
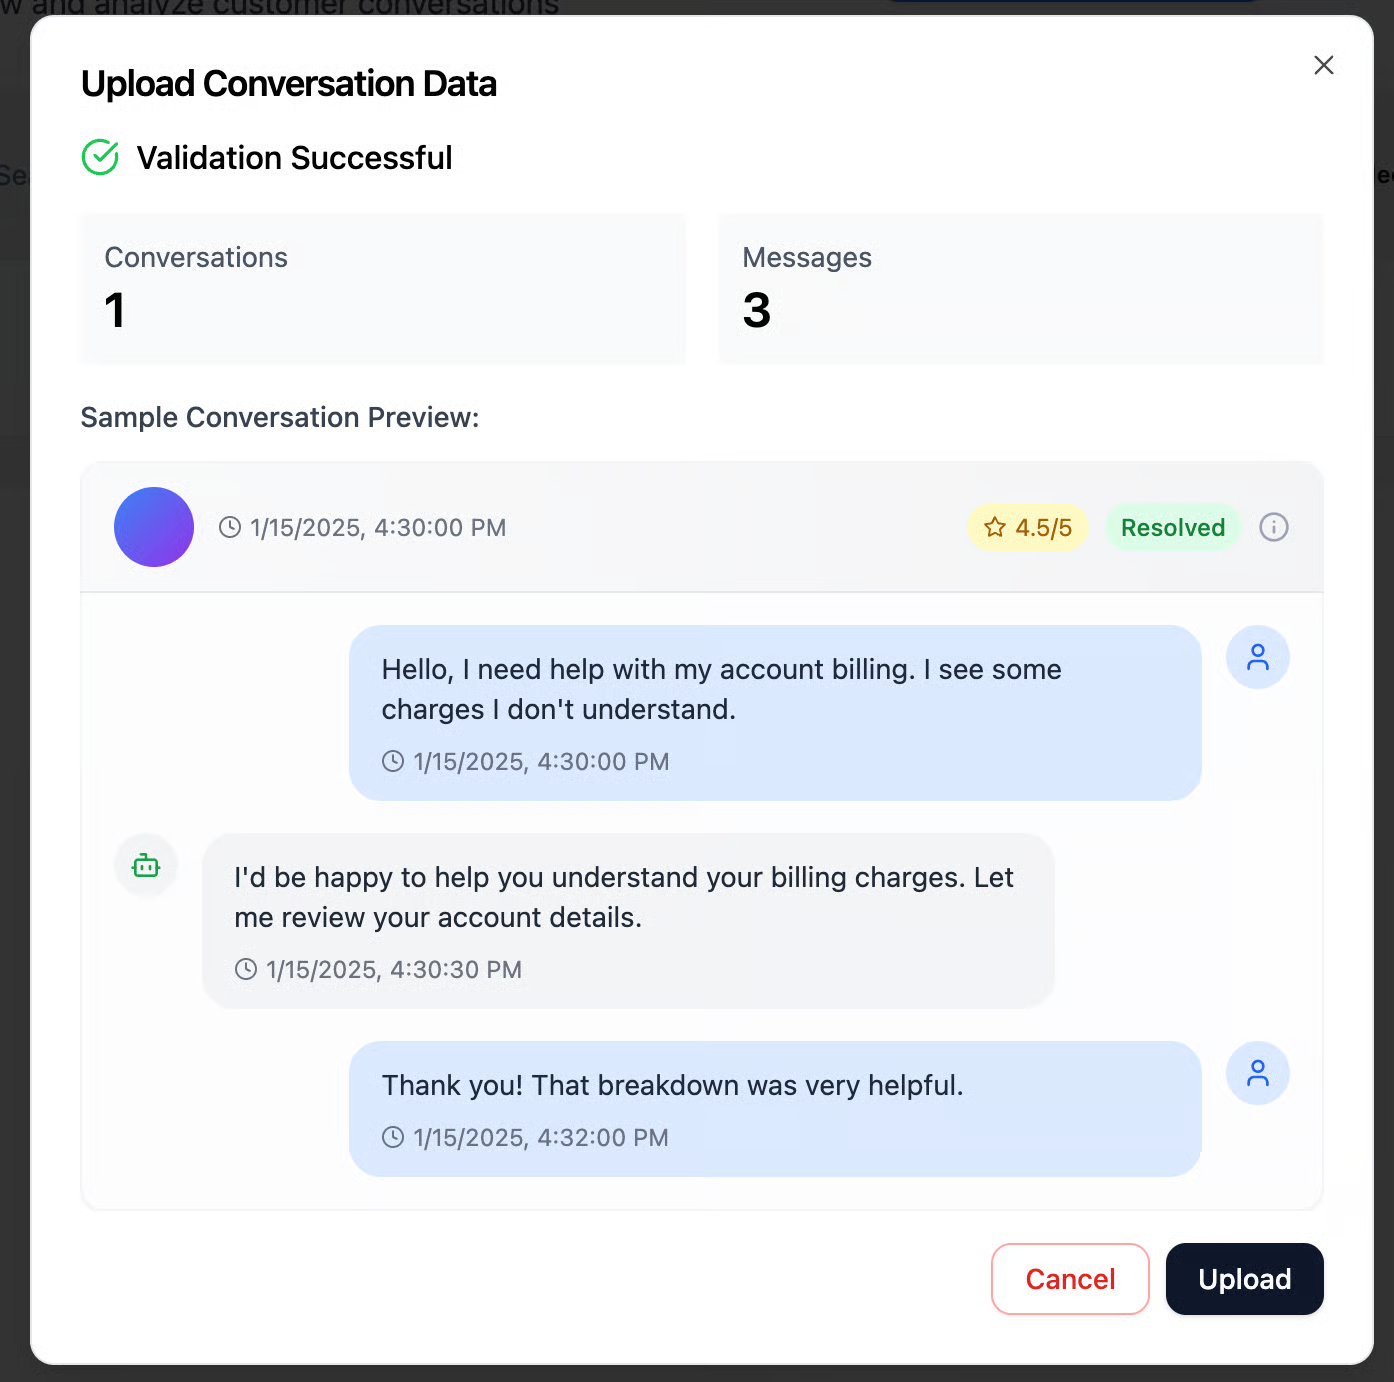
The JSON uploaded in the image above contains a single conversation with three messages. You can review the message content, any logs (if available – simply hover over the message), and additional related data.
After reviewing the messages, you can click Upload to submit the conversation to the system. Once uploaded, the conversation will appear on the Conversation Analysis page, where models will evaluate its quality and check for any alerts that will determine its score

Important tip: Make sure the conversation format is linked to the agent who conducted the conversation.
Automated process to upload conversations
📋 Prerequisites
Before you start, you'll need:
- ✅ An API Key (provided by Avon - contact your account manager)
- ✅ Your conversations data in the correct format
- ✅ A tool to make HTTP requests (curl, Postman, or your programming language)
🔑 Your API Key
You will receive your API key from Avon. It looks like this:
avk_f623d99c542ab07d9545XXXX
Important: Keep your API key secure! Don't share it publicly or commit it to version control.
🎯 Quick Start: Send Your First Conversation
Step 1: Create a Conversation
Every conversation starts with creating a conversation record:
curl -X POST https://app.avon-ai.com/api/conversations \
  -H "Content-Type: application/json" \
  -H "X-API-Key: YOUR_API_KEY_HERE" \
  -d '{
    "conversation_id": "conv_001",
    "agent": "support_bot_01",
    "timestamp": "2024-01-15T10:30:00Z",
    "is_resolved": false,
    "csat_score": 4.5
  }'
Response:
{
  "conversation_id": "conv_001",
  "agent": "support_bot_01",
  "timestamp": "2024-01-15T10:30:00Z",
  "is_resolved": false,
  "csat_score": 4.5,
  "created_at": "2024-01-15T10:30:05Z",
  "status": "success"
}
Step 2: Add Messages to the Conversation
Now add the messages (customer questions, agent responses) to your conversation:
# Customer's first message
curl -X POST https://app.avon-ai.com/api/messages \
  -H "Content-Type: application/json" \
  -H "X-API-Key: YOUR_API_KEY_HERE" \
  -d '{
    "message_id": "msg_001",
    "conversation_id": "conv_001",
    "role": "customer",
    "sender_id": "customer_123",
    "content": "Hello, I need help with my order",
    "timestamp": "2024-01-15T10:31:00Z"
  }'
# Agent's response
curl -X POST https://app.avon-ai.com/api/messages \
  -H "Content-Type: application/json" \
  -H "X-API-Key: YOUR_API_KEY_HERE" \
  -d '{
    "message_id": "msg_002",
    "conversation_id": "conv_001",
    "role": "agent",
    "sender_id": "agent_001",
    "content": "I will be happy to help! Can you provide your order number?",
    "timestamp": "2024-01-15T10:31:30Z"
  }'
# Customer's follow-up
curl -X POST https://app.avon-ai.com/api/messages \
  -H "Content-Type: application/json" \
  -H "X-API-Key: YOUR_API_KEY_HERE" \
  -d '{
    "message_id": "msg_003",
    "conversation_id": "conv_001",
    "role": "customer",
    "sender_id": "customer_123",
    "content": "Sure, my order number is ORD-12345",
    "timestamp": "2024-01-15T10:32:00Z"
  }'
That's it! Your conversation with 3 messages is now in AvonAI! 🎉
📖 API Reference
Base URL
https://app.avon-ai.com/api
Authentication
All requests require your API key in the header:
X-API-Key: YOUR_API_KEY_HERE
Create Conversation
Endpoint: POST /conversations
Required Fields:
| Field | Type | Description | Example |
|---|---|---|---|
conversation_id | string | Unique conversation ID | "conv_001" |
agent | string | Agent/bot identifier | "support_bot_01" |
timestamp | string | ISO 8601 timestamp | "2024-01-15T10:30:00Z" |
is_resolved | boolean | Conversation status | false |
Optional Fields:
| Field | Type | Description |
|---|---|---|
csat_score | number | Customer satisfaction (0-5) |
user_data | object | Custom metadata |
Example:
{
  "conversation_id": "conv_001",
  "agent": "support_bot_01",
  "timestamp": "2024-01-15T10:30:00Z",
  "is_resolved": false,
  "csat_score": 4.5,
  "user_data": {
    "source": "mobile_app",
    "language": "en"
  }
}
Add Message
Endpoint: POST /messages
Required Fields:
| Field | Type | Description | Example |
|---|---|---|---|
message_id | string | Unique message ID | "msg_001" |
conversation_id | string | Parent conversation ID | "conv_001" |
role | string | "customer", "agent", or "system" | "customer" |
sender_id | string | Who sent the message | "customer_123" |
content | string | Message text | "Hello, I need help" |
timestamp | string | ISO 8601 timestamp | "2024-01-15T10:31:00Z" |
Optional Fields:
| Field | Type | Description |
|---|---|---|
logs | array | Additional event logs |
Example:
{
  "message_id": "msg_001",
  "conversation_id": "conv_001",
  "role": "customer",
  "sender_id": "customer_123",
  "content": "Hello, I need help with my order",
  "timestamp": "2024-01-15T10:31:00Z",
  "logs": [
 		{"name": "Step Name", "content": "Step details or result"}
  ]
}
💻 Code Examples
Python
import requests
from datetime import datetime

API_KEY = "YOUR_API_KEY_HERE"
BASE_URL = "https://app.avon-ai.com/api"

headers = {
    "Content-Type": "application/json",
    "X-API-Key": API_KEY
}

# Create conversation
conversation = {
    "conversation_id": "conv_001",
    "agent": "support_bot",
    "timestamp": datetime.utcnow().isoformat() + "Z",
    "is_resolved": False
}

response = requests.post(
    f"{BASE_URL}/conversations",
    headers=headers,
    json=conversation
)
print(f"Conversation created: {response.json()}")

# Add message
message = {
    "message_id": "msg_001",
    "conversation_id": "conv_001",
    "role": "customer",
    "sender_id": "customer_123",
    "content": "Hello, I need help",
    "timestamp": datetime.utcnow().isoformat() + "Z"
}

response = requests.post(
    f"{BASE_URL}/messages",
    headers=headers,
    json=message
)
print(f"Message added: {response.json()}")
JavaScript (Node.js)
const axios = require('axios');

const API_KEY = 'YOUR_API_KEY_HERE';
const BASE_URL = 'https://app.avon-ai.com/api';

const headers = {
  'Content-Type': 'application/json',
  'X-API-Key': API_KEY
};

// Create conversation
async function createConversation() {
  const conversation = {
    conversation_id: 'conv_001',
    agent: 'support_bot',
    timestamp: new Date().toISOString(),
    is_resolved: false
  };

  const response = await axios.post(
    `${BASE_URL}/conversations`,
    conversation,
    { headers }
  );

  console.log('Conversation created:', response.data);
  return response.data;
}

// Add message
async function addMessage(conversationId) {
  const message = {
    message_id: 'msg_001',
    conversation_id: conversationId,
    role: 'customer',
    sender_id: 'customer_123',
    content: 'Hello, I need help',
    timestamp: new Date().toISOString()
  };

  const response = await axios.post(
    `${BASE_URL}/messages`,
    message,
    { headers }
  );

  console.log('Message added:', response.data);
  return response.data;
}

// Run
createConversation()
  .then(conv => addMessage(conv.conversation_id))
  .catch(error => console.error('Error:', error));
cURL (Bash Script)
#!/bin/bash

API_KEY="YOUR_API_KEY_HERE"
BASE_URL="https://app.avon-ai.com/api"
TIMESTAMP=$(date -u +%Y-%m-%dT%H:%M:%S)Z

# Create conversation
CONV_ID="conv_$(date +%s)"

curl -X POST "$BASE_URL/conversations" \
  -H "Content-Type: application/json" \
  -H "X-API-Key: $API_KEY" \
  -d "{
    \"conversation_id\": \"$CONV_ID\",
    \"agent\": \"support_bot\",
    \"timestamp\": \"$TIMESTAMP\",
    \"is_resolved\": false
  }"

# Add message
curl -X POST "$BASE_URL/messages" \
  -H "Content-Type: application/json" \
  -H "X-API-Key: $API_KEY" \
  -d "{
    \"message_id\": \"msg_$(date +%s)\",
    \"conversation_id\": \"$CONV_ID\",
    \"role\": \"customer\",
    \"sender_id\": \"customer_123\",
    \"content\": \"Hello, I need help\",
    \"timestamp\": \"$TIMESTAMP\"
  }"
🔍 Best Practices
1. Use Unique IDs
Always generate unique IDs for conversations and messages:
- ✅ Good:
conv_20240115_1030_abc123 - ❌ Bad:
conv_1(might conflict)
2. Include Timestamps
Always use ISO 8601 format with timezone:
- ✅ Good:
2024-01-15T10:30:00Z - ❌ Bad:
2024-01-15 10:30:00
3. Order Messages Chronologically
Send messages in the order they occurred to maintain conversation flow.
4. Handle Errors Gracefully
Always check the response status and handle errors:
response = requests.post(url, headers=headers, json=data)

if response.status_code == 200:
    print("Success!")
else:
    print(f"Error {response.status_code}: {response.json()}")
5. Batch Your Requests
If sending many conversations, consider batching them to avoid rate limits.
❓ Common Questions
Q: Where do I get my API key?
A: Your API key is provided by Avon. Contact your account manager or support team.
Q: Can I test the API before going to production?
A: Yes! Use your API key with the production endpoint. Your data is isolated to your account.
Q: What happens if I send the same conversation ID twice?
A: The system will update the existing conversation if the ID already exists.
Q: How do I know which tenant my data goes to?
A: Your API key is automatically linked to your account. All data goes to your isolated database.
Ready to get started? Grab your API key and send your first conversation! 🚀