Welcome to Avon AI - the management platform for AI agents.
To unlock the full potential of Avon AI’s platform, all you need to do is follow a few simple steps: choose your preferred language model, set up how agent conversations will be ingested, connect your Knowledge Base, and prepare a testing environment for your agent. This page will guide you step by step and give you a clear overview of what’s required to integrate with our platform.
Prerequisites Before Integration
Before starting the integration process with the Management AI Agent Platform, it is important to make sure you have all the required resources and access. Each prerequisite corresponds to a different core capability of the platform:
Avon Oversight (LLM Access + Conversations)
To use Avon Oversight (monitoring, analysis, and reporting on agent conversations), you need: LLM Access- An active API Key for the language model you plan to use (OpenAI, Gemini, etc.). Agent Conversations- Access to an S3 bucket or an API Endpoint where conversations can be uploaded in the supported JSON/JSONL format.
Knowledge Management (Knowledge Base – KB)
To allow your agents to rely on your company’s existing knowledge, you need one of the following: Vector DB- e.g., Pinecone (requires Index Name + Dimension). Articles/Documents File- A JSON/JSONL file that can be uploaded manually or ingested into ChromaDB directly within the platform.
Testing Framework (External Agent + API)
To run controlled tests on your agents before deploying them to real users, you need: External Agent- A test agent defined within the platform, not exposed to real users. API Endpoint- An active endpoint for your agent, with at least a /chat path that supports sending and receiving messages in the format required by our system.
Don’t worry if some of these requirements sound complex- we will explain each of them in detail later in the Quickstart guide. We will also provide explanations for everything later in the Quickstart guide.
Key Terms and Concepts
To make working with the platform easier, it is important to understand the basic terms:
LLM Access – Access to the language model that powers your agent. Vector DB – A database where texts are stored as vectors. External Agent – An external agent intended for testing only. Endpoint – The API address where requests are sent and responses are received. Dimension – The number of dimensions used when texts are converted into vectors. Index Name – The name of the repository where all KB items are stored. ChromaDB – A vector database used to create a new KB directly within the platform.
Step 1: LLM Access – Choosing Your Language Model
The first step in connecting to Avon AI is to choose the language model (LLM) that your agent will run on. Every agent requires LLM Access – meaning an active connection to a language model (API Key, usage permissions, etc.) so that our platform can interact with it.
Why is this important?
The language model is the core of your agent:
- It is responsible for understanding user text.
- It generates the agent’s responses.
- It directly affects the quality, style, and speed of the agent’s replies.
Without LLM access, the platform cannot perform analyses, run tests, or fully manage the agent.
Supported Language Models
Currently, Avon AI supports a variety of leading providers:
- OpenAI (GPT series) – widely used, reliable models suitable for general conversations, complex text analysis, and broad understanding.
- Google Gemini – especially strong in contextual understanding and integration with up-to-date information.
- Anthropic Claude – known for safer answers, with an emphasis on clear dialogue management.
- Cohere / Mistral / others – additional options as needed, tailored for focused NLP tasks or custom applications.
What to do at this step
- Choose an LLM provider that fits your business needs.
- Ensure you have an active API access (API Key) for the provider you selected.
- Inform your Avon AI Customer Success Manager of the chosen model so they can support your integration.
Step 2: Uploading Agent Conversations
To enable our platform to analyze your agent’s conversations, it’s essential that the conversations are properly ingested into the system. For this reason, it’s important to ensure that conversations are uploaded in a structured and compatible format.
Ways to Upload Agent Conversations
There are several methods to get your agent’s conversations into the platform: S3 upload, API Integration, Manual Upload and Custom Format.
1. S3 Upload- In progress
What to do:
Set up an S3 bucket where all your agent’s conversations will be stored. Share the bucket details with us (name, access permissions). Ensure that conversations are stored in our JSON format:
[
  {
    "conversation_id": "avon-ai-example-conv-001",
    "timestamp": "2025-01-15T14:30:00.000Z",
    "agent_id": "agent-avon-ai-001",
    "is_resolved": true,
    "csat_score": 4.5,
    "missing_info": {
      "reason": "customer_privacy_preference",
      "fields": ["phone_number"]
    },
    "user_data": {
      "account_type": "premium",
      "subscription_tier": "professional",
      "preferences": {
        "language": "en-US",
        "notifications": true
      },
      "last_activity": "2025-01-14T14:30:00.000Z"
    },
    "messages": [
      {
        "message_id": "msg-001",
        "conversation_id": "avon-ai-example-conv-001",
        "role": "customer",
        "sender_id": "user-001",
        "content": "Hello, I need help with my account billing. I see some charges I don't understand.",
        "timestamp": "2025-01-15T14:30:00.000Z",
        "logs": [
          {
            "action": "user_input",
            "source": "web_chat",
            "session_id": "sess-001"
          }
        ]
      },
      {
        "message_id": "msg-002",
        "conversation_id": "avon-ai-example-conv-001",
        "role": "agent",
        "sender_id": "agent-avon-ai-001",
        "content": "I'd be happy to help you understand your billing charges. Let me review your account details.",
        "timestamp": "2025-01-15T14:30:30.000Z",
        "logs": [
          {
            "action": "account_lookup",
            "status": "success",
            "duration_ms": 245,
            "records_found": 3
          }
        ]
      },
      {
        "message_id": "msg-003",
        "conversation_id": "avon-ai-example-conv-001",
        "role": "customer",
        "sender_id": "user-001",
        "content": "Thank you! That breakdown was very helpful.",
        "timestamp": "2025-01-15T14:32:00.000Z",
        "logs": [
          {
            "action": "satisfaction_indicated",
            "confidence": 0.95
          }
        ]
      }
    ]
  }
]
What’s inside the JSON format:
- conversation_id – A unique identifier for each conversation.
- timestamp – The time when the conversation started.
- agent_id – The identifier of the agent or bot managing the conversation. (Further elaboration is provided at the end of this page.). is_resolved – Whether the issue was resolved.
- Csat_score – The customer satisfaction rating (e.g., 4.5 out of 5).
- missing_info – Information the customer did not provide, for example, a phone number hidden due to privacy.
- user_data – Information about the customer: account type, subscription tier, language preferences, notifications, and last activity.
- messages – A list of messages exchanged between the customer and the agent. Each message contains:
- role – Whether the sender is the customer or the agent.
- content – The text written by the customer or agent.
- timestamp – When the message was sent.
- logs – Internal records documenting actions that occurred during the conversation, such as account lookups or user inputs.
How to know what is your Agent_ID?
To work with the platform (including conversation uploads, analysis, and tests), you need to know your Agent_ID. This is a unique identifier that links conversations, tests, and all other data to your specific agent. There are a few ways to locate it:
-
If You Created the Agent Directly in the Platform
- Go to the Admin Panel.
- Select the agent you created.
- Navigate to Integrate → General.
- There you will see the Agent_ID field – this is the unique identifier automatically generated when the agent was created.
Tip: You don’t need to manually assign the Agent_ID – the system generates it automatically to ensure uniqueness and consistency.
-
If You Are Connecting an External Agent (OpenAI, Gemini, Anthropic, etc.)
If your agent was built with an external model provider and not directly in our platform:- You still need an Agent_ID in our platform to map conversations and data correctly.
- If you haven’t created one yet:
- Go to Create Agent.
- Choose the External Agent option to connect your existing agent.
- Fill in the agent details (including the type of LLM you are using).
- After saving, your Agent_ID will be displayed – use this in all integrations with our API.
Even if your agent is managed externally (e.g., via OpenAI /chat/completions or Google Gemini), the Agent_ID generated by the platform is essential. It serves as the mapping layer between Avon AI and your agent, enabling proper integration of your Knowledge Base, conversation uploads, and testing. Without this ID, you cannot link data, run tests, or manage your agent within the platform.
2. API Integration
What to do:
- You can upload conversations directly via the platform’s API and endpoints.
- All information about the endpoints and required data format is available in the documentation:
Link: https://staging.avon-ai.com/api/swagger#/
3. Custom Format with Our Team
What to do:
If you have a unique conversation format, contact Avon AI team. We will create an automatic conversion to ensure smooth upload of your conversations to the platform.
4. Manual Upload
What to do:
Conversations can be uploaded manually through the platform interface. Note: This method is not automated, so uploads need to be repeated periodically depending on the conversation volume.
How to manual upload:
To upload conversations manually, please ensure the following:
- Manual upload is possible even if you have not yet connected or created an agent in the system. However, note that during the upload, you must use the ID of the relevant agent. Further explanation about the agent ID will be provided later in the guide.
To manually upload conversations, use the button located at the top of the Conversation Analysis page. After clicking the button, you can manually upload a conversation in two ways:
- Paste the conversation text in JSON format.
- Upload a JSON file from your computer.
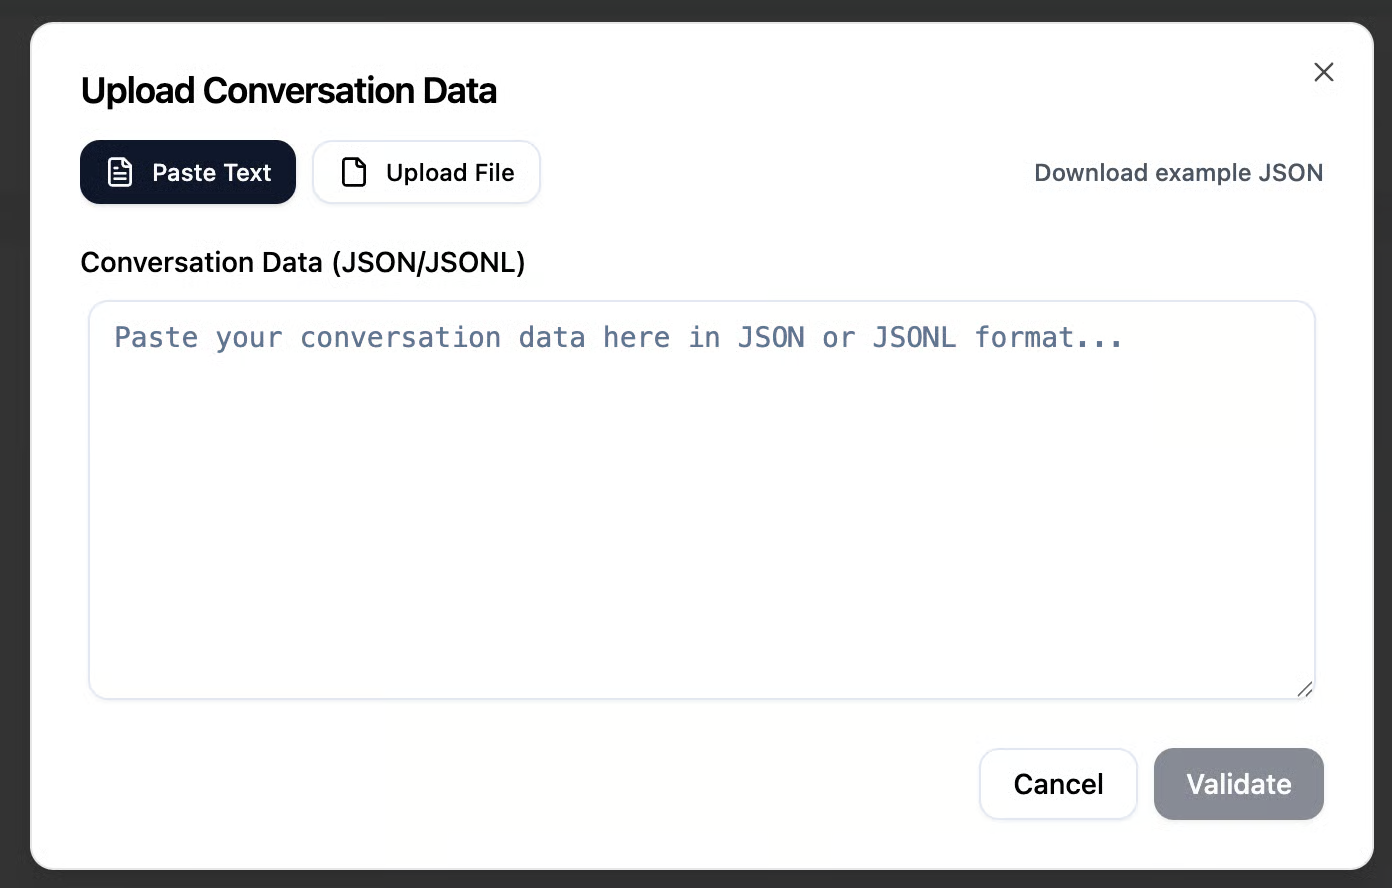
The conversation must be uploaded in JSON or JSONL format. A specific format is provided below, which you can adapt your conversations to before uploading. After uploading the file or pasting your conversation in JSON format, you can click the Validate button to preview how the conversation will appear before submitting it to the system.
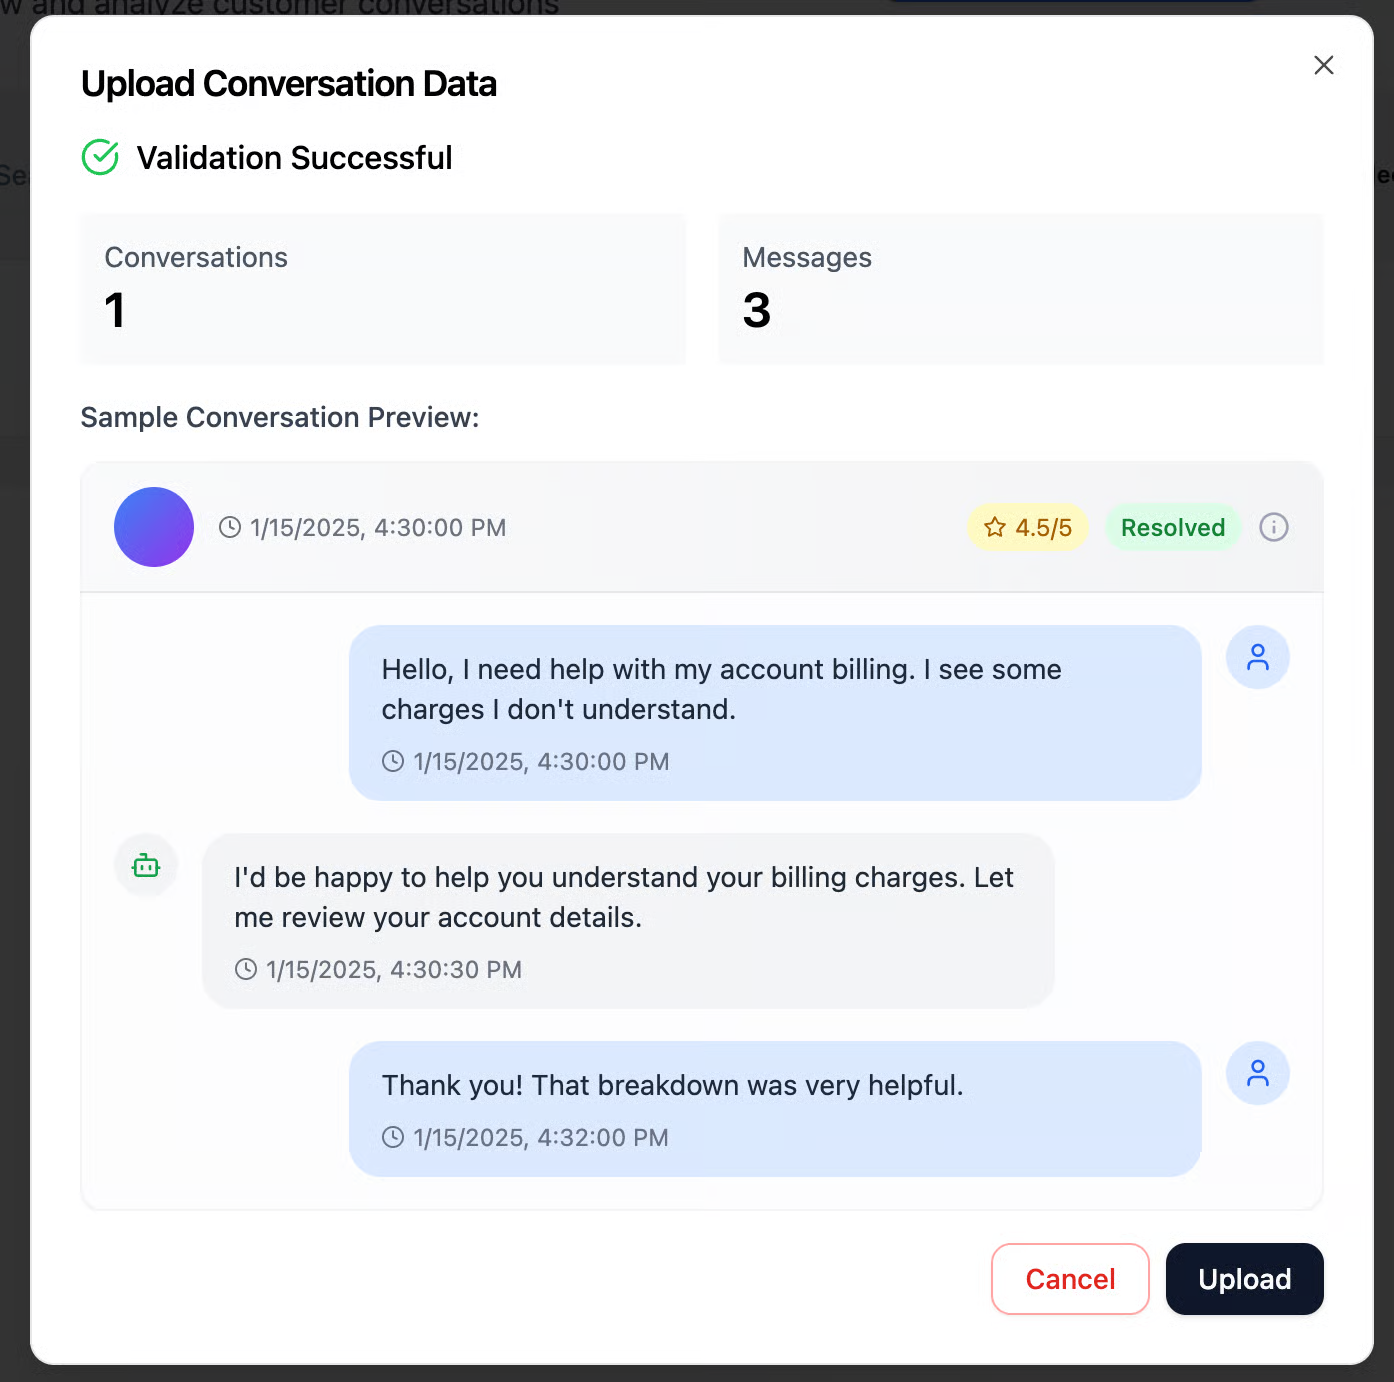
The JSON uploaded in the image above contains a single conversation with three messages. You can review the message content, any logs (if available – simply hover over the message), and additional related data. After reviewing the messages, you can click Upload to submit the conversation to the system. Once uploaded, the conversation will appear on the Conversation Analysis page, where models will evaluate its quality and check for any alerts that will determine its score

Important tip: Make sure the conversation format is linked to the agent who conducted the conversation.
JSON format:
[
  {
    "conversation_id": "avon-ai-example-conv-001",
    "timestamp": "2025-01-15T14:30:00.000Z",
    "agent_id": "agent-avon-ai-001",
    "is_resolved": true,
    "csat_score": 4.5,
    "missing_info": {
      "reason": "customer_privacy_preference",
      "fields": ["phone_number"]
    },
    "user_data": {
      "account_type": "premium",
      "subscription_tier": "professional",
      "preferences": {
        "language": "en-US",
        "notifications": true
      },
      "last_activity": "2025-01-14T14:30:00.000Z"
    },
    "messages": [
      {
        "message_id": "msg-001",
        "conversation_id": "avon-ai-example-conv-001",
        "role": "customer",
        "sender_id": "user-001",
        "content": "Hello, I need help with my account billing. I see some charges I don't understand.",
        "timestamp": "2025-01-15T14:30:00.000Z",
        "logs": [
          {
            "action": "user_input",
            "source": "web_chat",
            "session_id": "sess-001"
          }
        ]
      },
      {
        "message_id": "msg-002",
        "conversation_id": "avon-ai-example-conv-001",
        "role": "agent",
        "sender_id": "agent-avon-ai-001",
        "content": "I'd be happy to help you understand your billing charges. Let me review your account details.",
        "timestamp": "2025-01-15T14:30:30.000Z",
        "logs": [
          {
            "action": "account_lookup",
            "status": "success",
            "duration_ms": 245,
            "records_found": 3
          }
        ]
      },
      {
        "message_id": "msg-003",
        "conversation_id": "avon-ai-example-conv-001",
        "role": "customer",
        "sender_id": "user-001",
        "content": "Thank you! That breakdown was very helpful.",
        "timestamp": "2025-01-15T14:32:00.000Z",
        "logs": [
          {
            "action": "satisfaction_indicated",
            "confidence": 0.95
          }
        ]
      }
    ]
  }
]
What’s inside the JSON format:
- conversation_id – A unique identifier for each conversation.
- timestamp – The time when the conversation started.
- agent_id – The identifier of the agent or bot managing the conversation. (Further elaboration is provided at the end of this page.). is_resolved – Whether the issue was resolved.
- Csat_score – The customer satisfaction rating (e.g., 4.5 out of 5).
- missing_info – Information the customer did not provide, for example, a phone number hidden due to privacy.
- user_data – Information about the customer: account type, subscription tier, language preferences, notifications, and last activity.
- messages – A list of messages exchanged between the customer and the agent. Each message contains:
- role – Whether the sender is the customer or the agent.
- content – The text written by the customer or agent.
- timestamp – When the message was sent.
- logs – Internal records documenting actions that occurred during the conversation, such as account lookups or user inputs.
Step 3: Connecting Your Company’s Knowledge Base (KB) to the Platform
To enable your agents to utilize your company’s existing information, you need to connect the Knowledge Base (KB) to the platform. Our system offers two main options for connecting a KB:
1. Creating a Manual KB within the Platform (ChromaDB)
You can create a new KB directly within our platform using ChromaDB. ChromaDB is a vector database that allows storing texts as vectors, enabling the system to perform context-based searches and intelligent question-and-answer retrieval. With this connection, you manually input the information or documents you want, and the system generates a KB that is ready for use by your agents.
2. Connecting an Existing Company Vector DB
You can connect your existing KB directly to a Vector DB. Currently, the platform has native support for Pinecone. Pinecone is a well-known vector database system that allows efficient and organized storage of texts, enabling fast and accurate AI-powered searches. It is also possible to connect other vector databases – for this, you need to contact the Avon AI team for full guidance.
Connecting with Pinecone – Required Information
When connecting a Pinecone Vector DB to the platform, you need to provide two main parameters: Index Name – the name of your vector index This is the name of your vector repository. Think of it like a folder on your computer: all your knowledge items are stored in an organized way. Choose a clear name that describes the content of your KB. Dimension – the vector dimension This refers to how your texts are converted into vectors by AI. Enter the number corresponding to the dimension used by your Vector DB.
Step 4: Testing Framework – Agent Testing
The Testing Framework feature allows you to create tests and evaluate your agents in a controlled environment before they interact with real users. This enables you to check:
- The quality of the agent’s responses
- Compliance with the standards of your KB
- Detection of issues such as PII, misunderstanding of questions, or anomalies in responses
What do you need to do
To use the Testing Framework, two main steps are required:
- Create an External Agent
- This is an “external” agent connected to the platform but not deployed to real users.
- The external agent serves as a simulation for your tests.
- Customers need to provide the basic details of the agent as defined in the platform.
- Define an API Endpoint in Our Format
- Every test in the system is based on sending and receiving messages via API.
- Customers need to define an endpoint where the external agent receives requests and returns responses.
- The format must comply with the schema required by the platform (including message structure, conversation ID, timestamp, etc.).